|
|
Post by "DoubleAction" on Aug 26, 2009 0:54:35 GMT -5
|
|
|
|
Post by "DoubleAction" on Mar 28, 2013 14:50:45 GMT -5
Sept 22, 2004 ...Today I was browsing the specs of the CQB, in a 2002 Wilson Combat Catalog. I noticed that the CQBs had the #314c Sear and #455 Hammer installed. These are Metal Injected Molded parts, commonly referred to as "MIM".
I retrieved a newer updated 2003 catalog and noticed that the CQBs had the #314 Sear, and #337B Hammer installed. These parts are manufactured from machined steel.
I called customer service at Wilson Combat to get a track on this, and whether the suspicions of their sudden price increase was reflective from this change.
After talking to one of their reps, my suspicions was reaffirmed about the reasons of their price increase, and their change from using MIM parts to the Steel parts. The Hammer and Sear seemed to be the only two parts reflected in this cost cutting measure of a pistol costing very close to two thousand dollars.
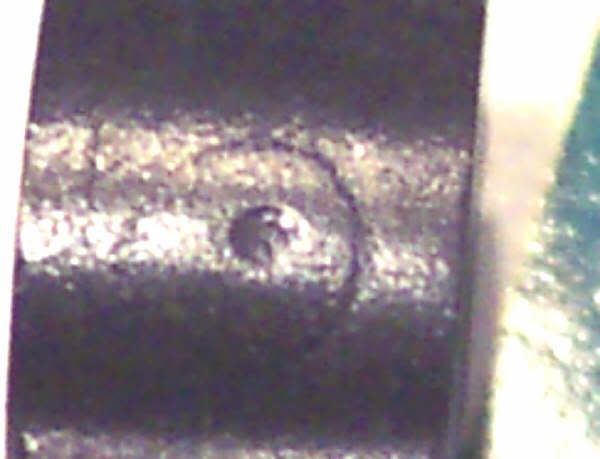
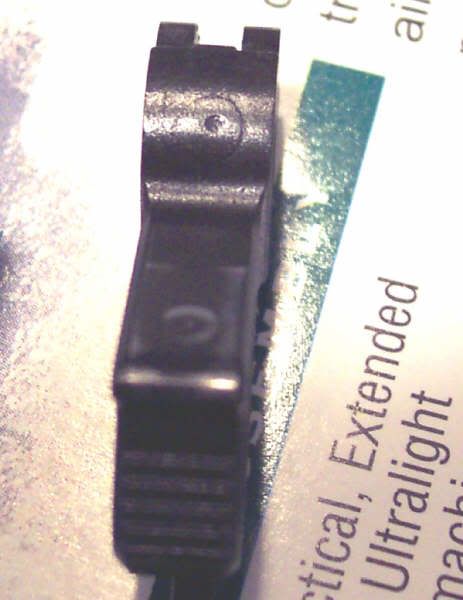
To tell the MIM from the Steel; Pull back on the hammer ( Chamber unloaded ) and look for a circle with a round dent in the center; This is MIM. |
|
|
|
Post by MLB on Mar 28, 2013 20:43:58 GMT -5
I'm not sure which parts are MIM in the Ruger, but there are reportedly quite a few. I'd suspect the hammer, mainspring housing, and grip safety. I'll have to take a closer look at the disconnector and sear.
|
|
|
|
Post by TMan on Mar 28, 2013 20:54:40 GMT -5
Are all plastic binders created equal? It appears not.
I've noticed a few broken shingles around the yard. Recall that I have the plastic shingles since 2005.
Well, talking to the roofing company it appears that in 2005 and 2006 the binders used were defective and couldn't hold up to the sun's rays.
No problem: they have a 50 year warranty. Problem: can't collect from a company that has gone out of business.
End result: ~$46,000 for a new roof.
So do you trust the binders in MIM parts? Would you be your life on it?
|
|
|
|
Post by MLB on Mar 29, 2013 20:52:54 GMT -5
As I understand the process, the binder is only used to hold the metal powder together as it's formed into its "near net shape". Afterward, the binder is removed via chemical or thermal means and the part is heated to sinter the metal particles together.
The resulting part reportedly has about 95% of the density of a machined part. I'm not sure if an MIM part can be similarly hardened.
|
|
|
|
Post by "DoubleAction" on Mar 29, 2013 22:51:51 GMT -5
.....MLB; When I clean my 1911s, I always detail strip the frame & slide; In doing so, it allows me to inspect each part for wear & damage after shooting. I have shot many rounds from my Wilson Combat pistols, and although, these pistols has the MIM Hammers & Sears, I have seen no difference in wear, or the shooting aspects of these pistols. The break in of these pistols was 500 rounds each, done at a single range session.
.......I could easily replace the hammer & sear, and replace them with harden steel parts, but, the pistols shoots accurate, fast, smooth, and the trigger breaks like glass with no play.
|
|
|
|
Post by MLB on Mar 30, 2013 22:35:10 GMT -5
At the current rate of $40/100 rounds, my 500 round break in will cost $200. Not too long ago, I was considering buying a Makarov for less than that.
I won't be changing out any parts soon. Maybe the trigger eventually. It's almost too bad that I like the grips that come with it. I'll probably try my hand at a custom set anyway. I have plenty of good looking hardwoods to play with.
|
|
|
|
Post by blueglass on Jun 25, 2013 20:22:26 GMT -5
You have the talent and the supplies so go for it. I am sure you can make really nice grips for it easily. We would all love to see them as well when you are done with them.
|
|
|
|
Post by MLB on Jun 25, 2013 21:15:09 GMT -5
I have some unfortunate news on the custom grip front. While they could look beautiful with the final finishing, I botched the grip screw holes and effectively torpedoed the grips.
I'll probably finish the grips just to work on my acid finishing technique, but I'll have to start over if they're ever to be used. Ah well. Live and learn.
|
|
|
|
Post by TMan on Jun 26, 2013 14:41:57 GMT -5
"acid finishing technique"? What is that? Did I miss a post somewhere?
|
|
|
|
Post by "DoubleAction" on Jun 27, 2013 0:13:40 GMT -5
I have some unfortunate news on the custom grip front. While they could look beautiful with the final finishing, I botched the grip screw holes and effectively torpedoed the grips.] .....MLB; I meant to say something about the seating of the 1911 grips. I posted this before : The 1911 grip screws tightens on the grip screw bushing, rather than the grip panels. What I like about the 1911 is the grip bushings, to prevent from cross threading the grip screws, or over tightening the screws. I wish my Sig Sauers had the grip bushings on their frame. .....The 1911 grip panels are recessed to be placed under the screw fitting, of the grip bushing. You will see the step down between the bushing & the screw fitting of the screw bushing. If the grip panel is too loose, it will have play and rattle. If too tight, the grip screws will torque on the grip panel. ......What happened ? ........MLB; Don't discard the grip panels......If the holes are too loose, you can fill the holes in with old style Sig Sauer P-220/P-226 grip screw torque washers. .......Our own "TOP GUN SUPPLY" |
|
|
|
Post by MLB on Jun 28, 2013 21:52:07 GMT -5
A friend of mine showed me a finishing technique that darkens and brings out the full effect of the wavy maple wood, without diminishing the prismatic effect it has. I'll finish the pieces, and perhaps with DA's advice, still have serviceable panels.
In the future, I'll start by drilling the grip screws and shape the panels around them. I was just foolish while marking out the holes and cut them perfectly in the wrong spot. Just where I marked them. Live and learn. I should have some time this weekend.
|
|
|
|
Post by "DoubleAction" on Jun 29, 2013 13:43:15 GMT -5
...MLB; If the Diameter of Lock Washers, for the Grip screws, is too wide.....You can use a small size bolt, place the washers onto the bolt, place a nut on the bolt, place the bolt in a drill motor, and use a file or sandpaper to make the diameter to fit into the grip holes.
|
|